| Advanced ColdFusion Administration
|


|
Configuring ColdFusion Clusters
|
Session-Aware Load Balancing
Managing your Web application's state in a clustered environment can be challenging. By default, Web application, session, and server variables that get stored in memory or a repository during a user session are not persisted during a server redirection. Consequently, the Web server cannot maintain the application's state correctly.
To overcome this problem, ClusterCATS provides a session-aware load balancing feature that lets you maintain application state in a clustered environment.
One method for maintaining your ColdFusion Web application's state is to create session variables that get stored on the Web server. For an e-commerce Web site that is clustered, it is vital that users do not get redirected to another server in the middle of their session. If they did, their online transactions would be interrupted, making for an unsuccessful and frustrating user experience.
To ensure that users are not redirected from the server on which they start their session, ClusterCATS provides a built-in feature for enabling session-aware load balancing. Sometimes referred to as a "sticky" server, session-aware load balancing guarantees that users will not get bumped from the server on which they start their session until the session is complete, regardless of the load thresholds that have been defined for that server.
|
Note Session-aware load balancing may not work if you use absolute hyperlinks in your Web pages. Absolute links route the HTTP request back to the cluster entry point and redirect according to the current load threshold without regard to the state of the requesting client. To avoid this inadvertent loss of state, be sure to use only relative linking in your Web pages.
|
This section describes the following:
Enabling session-aware load balancing on Windows
To enable session-aware load balancing:
- Open the ClusterCATS Explorer and select a cluster.
- Select Configure > Administration. Alternatively, you can right-click on the cluster and select Configure > Administration.
The Cluster Properties dialog box appears:

- Select the Session State Management check box.
- Click OK.
Enabling session-aware load balancing on UNIX
To enable session-aware load balancing:
- Open ClusterCATS Web Explorer if it is not already open.
- Click the Show Cluster link.
The Show Cluster page appears:

- Enter the fully qualified host name of the server for which you want to configure session-aware load balancing in the Web Server Name field.
- Click OK.
The Cluster Member List page appears:
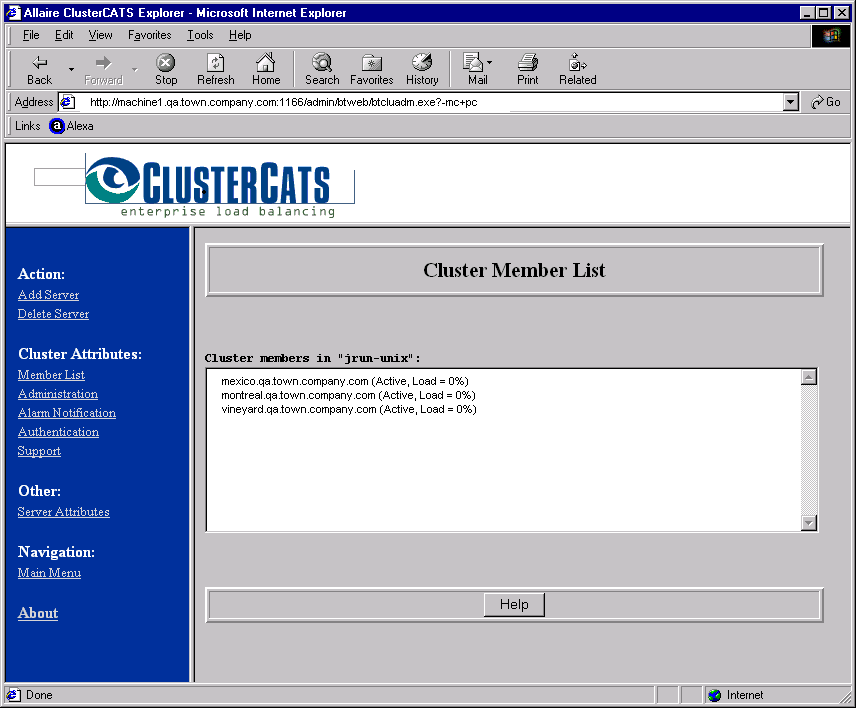
- Click the Administration link under Cluster Attributes.
The Cluster Administration page appears:

- Select the Enable session-aware load balancing check box.
- Click OK to enable session-aware load balancing for the selected cluster.
Configuring ColdFusion probes in Windows
This section describes the following:
Adding ColdFusion probes
ClusterCATS lets you set up one probe monitor for each server in the cluster. Each monitor can have multiple probes associated with it. As a result, clusters will typically have multiple probe monitors (one for each server), and each monitor may have one or more probes.
The procedure for adding a new monitor and probe is different from adding a probe to a server that already has a probe monitor. This section describes how to perform both activities.
|
Note The ColdFusion service must be running on your server to add a probe.
|
To add a new monitor and ColdFusion probe:
- Open the ClusterCATS Explorer and select a server.
- Select Server > New Monitor. Alternatively, you can right-click the server and select New Monitor.
The New Monitor dialog box appears:

- Enter a name you want to assign to this probe's monitor in the Name field on the New Monitor dialog box and click OK.
The monitor's Properties dialog box appears:

- Click the New Probe button
 .
.The ColdFusion Web Application Probe settings dialog box appears:
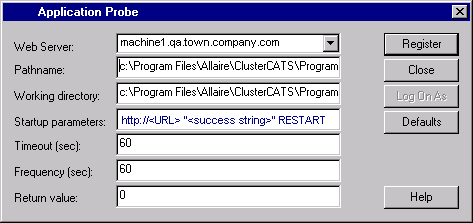
- Configure the application probe settings as described in the following table:
| Field |
Description |
Web Server
|
Select the name of the server from the drop-down list.
|
Pathname
|
Enter the absolute path to the ColdFusion probe. Do not change the default selection unless you installed ColdFusion to a directory other than the default installation directory.
|
Working directory
|
Enter the absolute path to the probe's working directory. Do not change the default selection unless you installed ColdFusion to a directory other than the default installation directory.
|
Startup Parameters
|
Replace the <URL> with the actual URL of the site you want the probe to access, and replace <success string> with a text string that appears on apage on the site you are probing.
Tips.
- Be sure to include a space between the URL and the success string that you specify. The success string must be enclosed in quotation marks.
- Do not modify the RESTART explicit parameter if you want the probe to automatically restart the ColdFsion Server upon detecting a failure. However, if you do not want ClusterCATS to auatomatically restart the ColdFusion Server upon detecting a failure, replace RESTART with NORESTART.
|
Timeout (sec)
|
Enter a time, in seconds, to indicate how long ClusterCATS should wait before a ColdFusion server failure is registered.
Do not set this value to less than 60 seconds because ClusterCATS may restart the ColdFusion server inadvertently (due to network congestion, for example), rather than detect an actual failure on the ColdFusion server.
|
Frequency (sec)
|
Enter a time, in seconds, to indicate how often the probe checks the ColdFusion server.
Probes that restart Web applications should be configured to run no more frequently than the time it takes to stop and restart ColdFusion. This time is highly site-specific, because it depends on the system resources available on the servers and the volume of traffic at the site.
For probes that do not restart the Web application, the Frequency depends on how long you can reasonably afford to have your Web application off-line. A minimum Frequency of 15 seconds is recommended.
|
Return Value
|
Enter 0 so that the probe succeeds on a successful probing of the page. Enter a non-zero number to have the probe succeed on a failure.
The default is 0. Only under rare circumstances would you change this to a non-zero number.
|
- Click Register to create the probe.
- Close all open dialog boxes.
Icons for the monitor and probe appear under the Monitor Manager in the ClusterCATS Explorer.
To add a new probe to an existing probe monitor:
- Open the ClusterCATS Explorer.
- Select the cluster_name > Monitor Manager > monitor_name in the left pane.
- Select Monitor > Properties. The monitor's Properties dialog box appears:
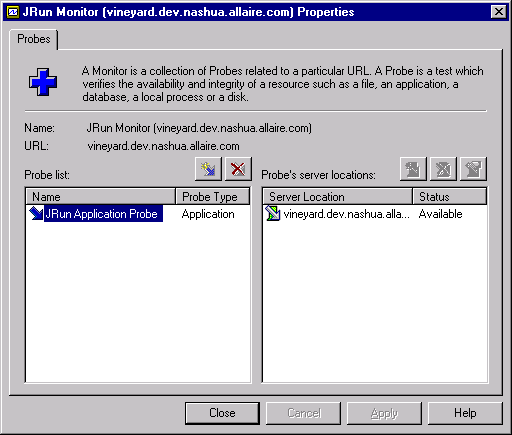
- Click the New Probe button
.
The ColdFusion Web Application Probe settings dialog box appears:
- Configure the application probe settings as described in the table on Field.
- Click Register to create the probe.
- Close all open dialog boxes.
An icon for the new probe appears under the Monitor Manager in the ClusterCATS Explorer.
Removing ColdFusion probes
To remove a ColdFusion probe:
- Open the ClusterCATS Explorer.
- Select the cluster_name > Monitor Manager > monitor_name > probe_name in the left pane.
- Select Probe > Delete. Alternatively, you can right-click the probe and select Delete.
Configuring ColdFusion probes in UNIX
This section describes the following:
Adding ColdFusion probes
To add a new ColdFusion probe:
- Open the ClusterCATS Web Explorer if it is not already open.
- Click the Show Cluster link. The Show Cluster page appears.
- In the Web Server Name field, enter the fully qualified host name of the server for which you want to configure the ColdFusion probe.
- Click OK. The Cluster Member List page appears.
- Click the Server Attributes link. The Connect To Server page appears.
- Select the server you want to add a probe to from the Web Server Name listbox.
- Click OK. The selected server's Properties page appears.
- Click the ColdFusion Probe link.
If there are existing probes for this server, the Probe List page appears:
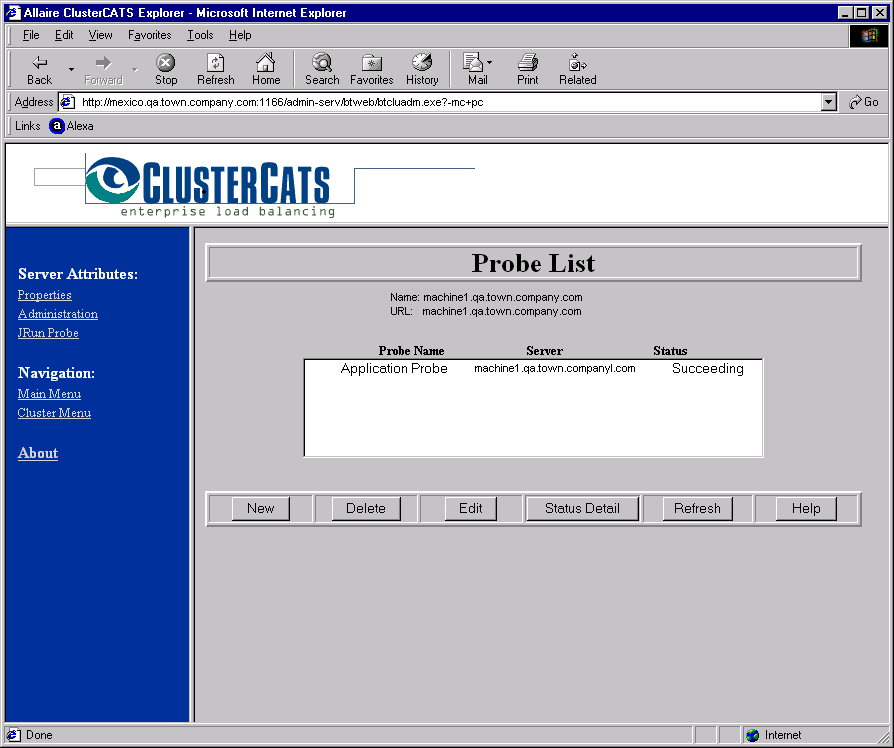
- To create a new probe, click New. The ColdFusion Application Probe page appears:
If this is the first probe for this server or you clicked New to add another probe, the ColdFusion Application Probe page appears:
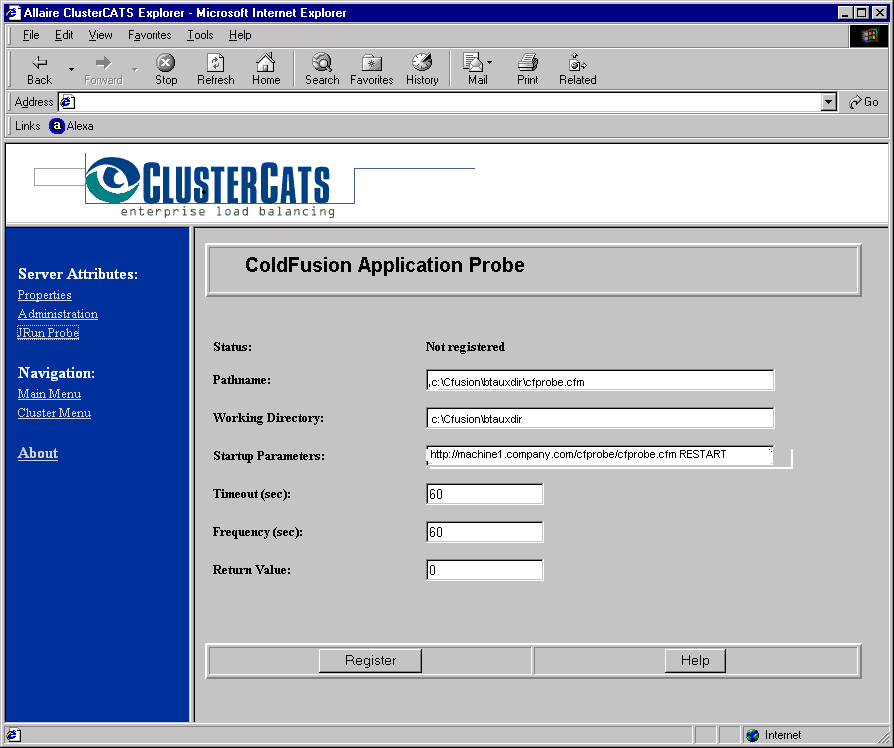
- Configure the application probe settings as described in the following table.
| Field |
Description |
Status
|
This is an informational field. If the probe is not registered, the Status displays Not registered. If the probe is registered, the Status displays Succeeding.
|
Pathname
|
Enter the path to the ColdFusion probe. Do not change the default selection unless you installed ClusterCATS for ColdFusion to a directory other than the default installation directory.
|
Working directory
|
Enter the path to the probe's working directory. Do not change the default selection unless you installed ClusterCATS for ColdFusion to a directory other than the default installation directory.
|
Startup Parameters
|
Enter the actual URL of the site you want the probe to access followed by a text string that appears on a page within the site you are probing (cfprobe.cfm in the screen shown in step 9.)
Note: Do not modify the RESTART explicit parameter if you want the probe to automatically restart the ColdFusion Server upon detecting a failure. However, if you do not want ClusterCATS to automatically restart the ColdFusion Server upon detecting a failure, replace RESTART with NORESTART.
|
Timeout (sec)
|
Enter a time, in seconds, to indicate how long ClusterCATS should wait before a ColdFusion server failure is registered.
Do not set this value to less than 60 seconds because ClusterCATS may restart the ColdFusion server inadvertently (due to network congestion, for example), rather than detect an actual failure on the ColdFusion server.
|
Frequency (sec)
|
Enter a time, in seconds, to indicate how often the probe checks the ColdFusion server.
Probes that restart Web applications should be configured to run no more frequently than the time it takes to stop and restart ColdFusion. This time is highly site-specific, because it depends on the system resources available on the servers and the volume of traffic at the site.
For probes that do not restart the Web application, the Frequency depends on how long you can reasonably afford to have your Web application off-line. A minimum Frequency of 15 seconds is recommended.
|
Return value
|
Enter 0 so that the probe succeeds on a successful probing of the page. Enter a non-zero number to have the probe succeed on a failure.
The default is 0. Only under rare circumstances would you change this to a non-zero number.
|
- Click Register to create the probe. ClusterCATS begins to test the selected server immediately.
Editing and removing ColdFusion probes
To edit or remove a ColdFusion probe:
- Open the ClusterCATS Web Explorer if it is not already open.
- Click the Show Cluster link. The Show Cluster page appears.
- Enter the fully qualified host name of the server for which you want to configure the ColdFusion probe in the Web Server Name field.
- Click OK. The Cluster Member List page appears.
- Click the Server Attributes link. The Connect To Server page appears.
- Select the server that hosts the probe in the Web Server Name listbox.
- Click OK. The selected server's Properties page appears.
- Click the ColdFusion Probe link. The Probe List page appears.
- Select the probe you want to edit or remove.
- To remove the probe, click Delete. ClusterCATS removes the ColdFusion probe.
- To edit the probe, click Edit. A page with all the available probes appears.
- Edit the fields corresponding to the probe you want to change and click Register.
|
Copyright © 2001, Macromedia Inc. All rights reserved. |
|