| Advanced ColdFusion Administration |
|
|
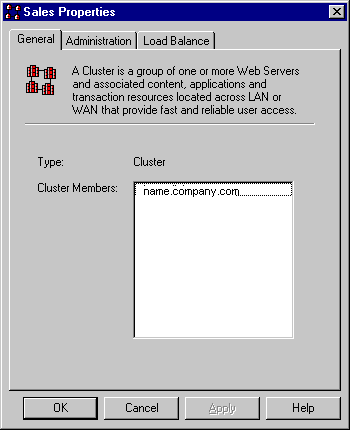
Configuring ColdFusion Clusters |
|
| Advanced ColdFusion Administration |
|
|
Configuring ColdFusion Clusters |
|
You can configure ClusterCATS to work in conjunction with a third-party hardware load balancing device or load balancing software product to provide comprehensive load balancing and failover support for your server clusters.
This section describes the following:
Cisco LocalDirector is a network appliance with a secure, real-time, embedded operating system that intelligently load balances IP traffic across multiple servers. ClusterCATS can be configured to provide ColdFusion availability and load information to the LocalDirector using Cisco's Dynamic Feedback Protocol (DFP). The LocalDirector then actively manages HTTP traffic across the cluster, based on the load information provided to it by ClusterCATS.
You can configure the Cisco LocalDirector using the ClusterCATS Explorer on Windows only.
|
Note You must use Cisco LocalDirector Version 3.1.4 software or later. |
Before configuring ClusterCATS with the LocalDirector, you must configure the LocalDirector to manage your Web servers. For more information, refer to the Cisco documentation.
You must be aware of the following when using ClusterCATS with Cisco LocalDirector:
Use the LocalDirector dynamic-feedback command options as described in this section to optimize your LocalDirector setup.
|
Note Do not use the |
dynamic-feedback -timeout
Use the dynamic-feedback -timeout option to set timeout to a value larger than the update frequency so that the LocalDirector does not prematurely terminate the connection with the cluster because of inactivity. Allaire recommends that you set the value to at least two times the update frequency.
dynamic-feedback -retry
Use the dynamic-feedback -retry option to set the retry value to zero (0) to ensure that the LocalDirector will continue connection attempts to the ClusterCATS DFP agent in the event of a lengthy period of system unavailability.
For more information on using the LocalDirector dynamic-feedback command, refer toCisco's LocalDirector Command Reference.
ping utility to test network connectivity.www.yourcompany.com) in LocalDirector that corresponds to the cluster.dynamic-feedback command to specify the IP addresses of each explicit server (cluster member) and port number each server will use to listen for DFP requests from the LocalDirector. This port number must be the same as the DFP Agent Listen Port configured in 9.For example:
dynamic-feedback 111.168.00.22:9100 retry 0 attempts 30 timeout 60
The DFP protocol will connect to server 192.168.64.22 at port 9124. If the connection between the LocalDirector and the server is closed for any reason, the LocalDirector will attempt to reconnect, indefinitely, every 30 seconds. The LocalDirector will close the connection if it is inactive for 60 seconds.
For more information on the dynamic-feedback command options, refer to "LocalDirector dynamic-feedback command settings".
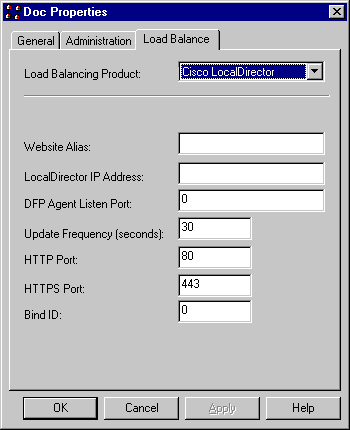
| Field |
Description |
|---|---|
| Website Alias |
Enter the name of the virtual server (www.yourcompany.com) you created in step 3. |
| LocalDirector IP Address |
Enter the IP address of the Cisco LocalDirector. |
| DFP Agent Listen Port |
Enter the port number on which the cluster's DFP agent should listen for incoming LocalDirector connection requests. This port should be the same port specified in the LocalDirector dynamic-feedback as described in step 5. |
| Update Frequency |
Enter the frequency, in seconds, that you want ClusterCATS to update the LocalDirector with availability data. This is typically a value between 5 and 30 seconds. You can lengthen it up to 120 seconds. Set a longer time as you add greater numbers of Web servers to the cluster. This minimizes the overhead of traffic to the LocalDirector. |
| HTTP Port |
Enter the port number on which each cluster member listens for unsecured HTTP requests. Enter 0 if not applicable. |
| HTTPS Port |
Enter the port number on which each cluster member listens for secured HTTP requests. Enter 0 if not applicable. |
| Bind ID |
Enter the same Bind ID specified for the explicit (real) servers on the LocalDirector in step 4. In order for the ClusterCATS/LocalDirector integration to work as intended, the server name, port number, and bind ID combination must be the same on this ClusterCATS Load Balance tab as it is on the LocalDirector box. |
Once configured, ClusterCATS automatically sets the state of each cluster member to Passive and provides the load balancing and high availability data it acquires to the LocalDirector. The LocalDirector then actively manages HTTP traffic across the cluster.
Third-party load balancing devices will actively distribute load to the Web servers based on packet flow while ClusterCATS monitors ColdFusion load and availability. If ClusterCATS detects that the ColdFusion server is becoming overloaded, it will supersede the load balancing device and redirect traffic accordingly.
This section describes how to configure a third-party load balancing device with ClusterCATS in the following sections:
The selection in the Load Balancing Product drop-down list indicates how ClusterCATS will actively load balance HTTP traffic across the cluster.
|
Note You cannot take advantage of ClusterCATS' support of Cisco LocalDirector using the ClusterCATS Web Explorer. This capability is only available in the Windows-based ClusterCATS Explorer. You can, however, configure Cisco LocalDirector as a third-party load balancing device to work with ClusterCATS. |
| Copyright © 2001, Macromedia Inc. All rights reserved. |
|